Unity: Ruby's Adventure Lesson 6/7
Ruby's Adventure: 2D Beginner - Unity Learn
Audio- I followed the audio chapter for Ruby's Adventure. This included adding background music with a Audio Source and one shot sounds for when
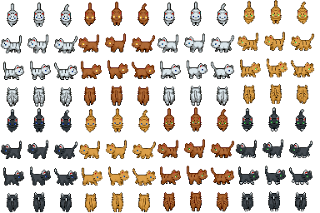
Started creating a cat sprite inspired by these cat sprites https://www.deviantart.com/biofunk95/art/Cat-Sprites-541217734
 |
| My moodboard for the sprite. |
 |
| https://www.deviantart.com/biofunk95/art/Cat-Sprites-541217734 My main inspiration (I looked at the 3rd cat set on the bottom row- the brown/ginger cat with stripes). I knew I wanted to have a cat sprite so I looked at some examples of cat sprites. I found this one ^ which shows the different views so I took inspiration from it and made my own version. I set up a photoshop document with 72dpi & 384 x 256 pixels. This was 6x4 64x64 squares. I used guides to mark out these squares and set up the grid to match (So I could see the middle of the squares, to help with aligning everything). I started off with a basic sketch of the outline. In hindsight I wish I had made this sketch a bit bigger since it is hard to scale it up and make it look the same. Once I was happy with the top left sketch I duplicated and flipped it for the 2nd frame of the animation. I then duplicated it again for the 1st Up frame so that I could make the head the same size. I continued this process until I had 2 frames for the up down and right animations as well as up down and right sitting and scared frames. I did try to make a cleaner more pixel art style of outline however this changed the shapes quite a bit so instead I went over the lines after adding the base colour on a different layer. I also had to change the outline colour since when I trialed the 1st frame I finished in front of the tilemap I created (by importing them both into a seperate photoshop document) The outline didn't really look the way I wanted it too and sort of blended in with the dirt. I also made note that I might need to alter the colours of the tiles slightly so that they work better with the characters colours. Prehaps making the dirt more grey toned since the cat is brown. |
Once the outline and base colour was done I added the stripes and the faces. The face was a bit challenging since I didn't have many pixels to work with and the face from the referencew didn't really work with my character.
Building and Platform game
We then went on to learn how we could build our game. The first thing to do before going to build your game is to make sure there are no errors and then to check that your scenes show up in the build menu.
We then switched the platform to WebGL by clicking on it in build settings and clicking switch platform. This will download the necessary elements.
We then went to project settings where we could edit the player settings like Company name, Project name, Version and icon.
We could then click build and it would create a folder with the game build in it. This could then be uploaded to Simmer.io or other similar sites. by dragging in the buildfolder to the upload section.
For submission of the project we would Zip the project files and upload them to onedrive for submission. We would also need top share the link to the game.
We also made a platformer version of Ruby's adventure. We used some assets from OpenGameArt.Org.
We added an empty object to the character and named it Ground Checker. This checked if the character is on the ground so it can jump. We also animated the moving platforms.


Comments
Post a Comment